I am wild about these Triangles...

I have been in a bit of a Peyote frenzy lately, and I just can’t get enough of this shape and technique.

This is the one that started it all. I found a video for this on YouTube by ViPBiser.

From there, I have been busy exploring and experimenting with the concept.

I love the way the bugle beads look in this tubular peyote project.  So I decided to teach you guys with my own idea for materials . 

20200308_104918

In this project, we will be working on my version. 

The Totally Tubular Peyote Triangle tutorial is broken down into two parts.

In Part 1, we will create the front portion of the bead work, by using what is essentially circular peyote technique with corner beads and increases. 

In Part 2, we will sew down into the center and create the back portion of the bead work using the same technique.

Then we will zip the front and back together on the outer edges, forming the tubular shape.

Tools and Materials

Here are the materials that I used in the project.

I have included my affiliate links, where available, for your convenience. The other links are to the places I purchased my items.

Using my links to purchase supplies, helps to support the free content I provide.

You can certainly use any color options you prefer, but I do suggest that you stick to the sizes listed here. 

Changing the size of your beads will alter the overall dimensions of the finished triangle. Depending on how you plan to use the triangles, it is important to consider bead size.

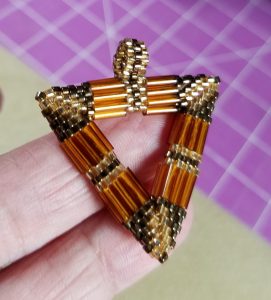
The dimensions of the triangle is 1-3/8 inch on each side and 1- 1/2 inch from tip up the center line.

Circular Peyote with Corner Increases

Circular peyote is a form of flat peyote that is worked in a round. All the beads of the first two rows are picked up and tied into a circle. 

The beads will constitute the three sides of the triangle with two seed beads in between each segment that will form the corners.

We will use traditional Herringbone stitch at the corners to create the increases in each additional round of stitching. 

We will use Peyote stitch along the sides of our shape.

This side of our bead work will consist of seven rows. 

If you are unfamiliar with this stitch, I suggest that you begin with Peyote Stitch Basics in my Bead Weaving 101 series and work through the basics before beginning advanced projects. 

I will be working with Nymo Beading thread. 

Each piece will require about 3 feet of beading thread.

The thread should be stretched and conditioned, prior to threading onto the beading needle. 

If you have not worked with nylon thread before, make sure to check out my new post, How to Work with Nylon Beading Threads

NylonThread

Rows 1 & 2

In Peyote stitch, the beads of the first two rows are picked up initially.

Pick up the following bead sequence three times. 

1 DB – 1 BB – 1 DB – 1 SB – 1 DB – 1 BB – 1 DB – 2 SB

Tie the beads into a round using two overhand knots, making sure the knots fall between the first and last beads.

20200308_093739

Prior to stitching the third row, we need to position the working thread.

Pass the needle through the 11/0 SB.

Now we can begin the third row. 

Odd Numbered Rows

We begin the third row with a Herringbone stitch at the first corner of our triangle. 

Pick up 2 SB and pass through the next SB on the base.

Position the beads vertically above the beads below.

20200308_093806
20200308_093829

Peyote stitch up to the next corner.

Pick up the same bead you are skipping over and stitch through the next bead. 

In the odd number rows, we will primarily be stitching with DB’s.

As you sew into the next corner, you will always add a DB.

Repeat the steps above, for the Herringbone stitch, in each of the remaining corners.

Always pick up a DB as you Peyote stitch out of the corners.

20200308_093926
20200308_095157

As you add the last bead of the round, you will pass the needle through the SB on the base row and the SB above added in the current round.

This completes the round and steps you up for the next round. 

Even Numbered Rows

Begin row 4 by doing another Herringbone stitch in the first corner.

Pick up 2 SB and pass down the next SB.

Make sure to position the beads vertically before you begin Peyote along the sides of the triangle. 

20200308_095258
20200308_095317

Always pick up a DB as you stitch into and out of the corners on the even numbered rows too.


Afterwards, you will pick up the bead you are skipping over, as you continue to Peyote stitch the sides. 

In the even numbered rows, you will be adding the bugle beads and seed beads along the sides. 

20200308_095328
20200308_095708

Remember, as you add the last bead of the rounds, to pass the needle through the SB of the previous row and step up into the SB of the current round. 

In other words you pass through two seed bead. 

Repeat the steps for an odd row and an even row once more each.

This gives us a total of six rows. 

Row 7

Row 7 is worked exactly the same as the odd numbered rows with one exception.

In this round we are adding only one SB in the corners.  Pick up a SB and pass down the next SB.

20200308_100958

Follow the steps above for the odd numbered rows.

At the end of the round, you only need to pass up through the SB of the previous round as you add the last bead.


In Part 2 of the Totally Tubular Triangle project, we will learn to work from the center outwards to create the back side of the bead work.

And I will show you how to close the shape into the tubular form by using the traditional zippering technique. 

20200308_102424

In the meantime, make sure to subscribe to my Blog and Newsletter by using the forms in the sidebar or on the Contact page.