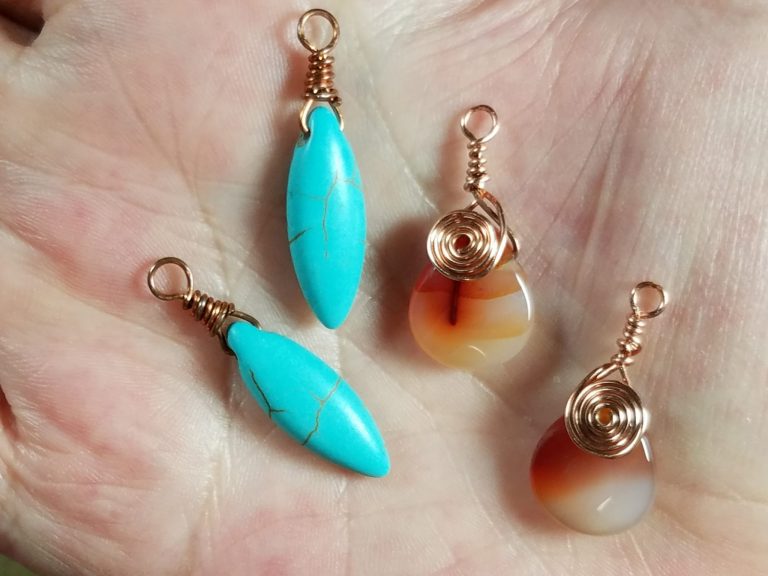
Recently, we learned to make the Simple Wrapped Drop Bead.
In this tutorial, we are focusing on Briolette Gemstone Beads.
Just like drop beads, Briolette beads are drilled from side to side, near the top of the bead.
This technique can also be used on Pendant Beads. Pendant beads and stones are drilled from front to back, near the top of the stone.
By wire wrapping the loop, we add strength and durability to the connection of the component.
The technique also adds texture and contrast by embellishing the bead for a more ornate look.
Today, we are going to take things one step further, by adding a wire spiral embellishment to the from of the finished component.
Earring
Charm Bracelets
Collar Necklaces
You can use the components in your jewelry designs as focal points or as multiple embellishments.
Let’s take a look at the materials and tools you will need for this tutorials and then we will get started. I have included my affilitate links where available.
By using my links, you help support the free content on this site. TYIA
Tools and Materials
The beads I used are long oval Carnelian Briolette Beads, that measure 12×15 millimeters.
The gauge of wire is determined by the size of the hole drilled through the bead. The goal is to use as thick and sturdy of a wire that your bead can handle. But not so thick that you run the risk of breaking your bead.
The technique is very similar to adding a wire wrapped loop to a regularly drilled round bead.
We have to make a few adjustments to account for the pointed tip of the drop or briolette beads.
The Tehcnique
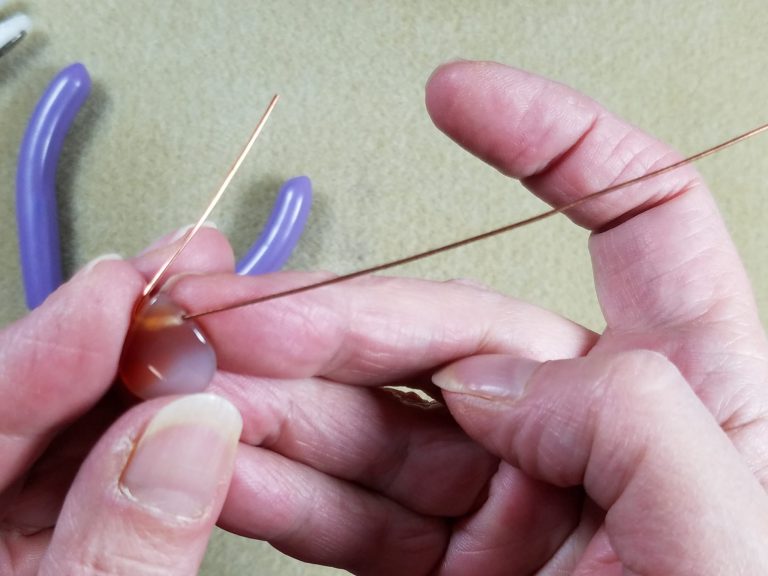
The first step is to measure and cut the wire.
The length you need is also determined by the bead, how long you want the wrapped section to be above the bead and the amount of wire needed to form the spiral at the end. It is better to have a little more wire than to cut the wire short. This gives you a little wiggle room, in case you need to make any adjustments or restart.
For this tutorial, I used 8.5 inch lengths of 22 gauge bare copper wire.
If you are planning to patina the wire, used bare copper.
If you like the shiny look of copper, use a tarnish resistant wire.
The wire should be flush cut on both ends then filed smooth and flat.
Check out my tutorials in Wire Work Basics, if you need help with these steps.
Position the wire through the bead with about two inches of the wire on one side.
Using your finger, work one side at a time, push the wire against the point of the bead until the wire crosses over the tip of the bead.
Repeat this on the other side until the wires cross over at a 90 degree angle to the tip of the bead.
The tip of the bead, needs a small space to move freely or the bead may crack or break.
Grasp the wires at the crossover point and twist them for a full rotation.
For the best results, use two half rotations for this step.
Bend the long wire straight up.
Using the flush cutters, trim the excess from the shorter wire.
Tuck the sharp point against the work with your chain nose pliers.
The following steps are exactly the same as those in perfect wire wrapped loops.
To form the loop, grasp the wire above the twist with the tip of your chain nose pliers.
Bend the long wire over to a 90 degree angle.
With the round nose pliers parallel to the bead, insert the wire between the barrels.
Get as close to the bend as possible.
Using your forefinger, push the wire up and over the barrel.
Continue pushing the wire down on the other side, until the wire is parallel to the gemstone.
Rotate the pliers, 180 degrees, so that the free barrel is now on the top and the pliers are once again parallel to the stone below.
Bring the wire under the lower barrel to a 45 dgree angle with the bead.
Grasp the loop with your chain nose pliers, with the long wire pointing outward and parallel to the barrel of the pliers.
Wrap the wire down the stem, in half rotations, until the coils meet the tip of the open triangle above the bead.
Repeat the half rotations with the long wire until you come to the spot where you bent the wires upwards.
Keep the coils tight against the previous wraps for a neat finished look.
If you are making mulitples of the component, count the number of half rotations.
For the best results, you want to end up on a half rotation. For example, if I have 4 copmplete wraps, I have made 8 half rotations.
Add one last half rotation to bring the wire to the back side of the project. I have made 9 half rotations before coiling my spiral.
Before we begin coiling the spiral, we need to make sure our remaining wire is straight, with no noticeable kinks.
Use nylong jaw pliers or your fingers to smooth out the wire.
For Matching Spirals on Mulitple Components
Wrap the second component using the directions above.
Measure your remaining long wire on each and use the flush cutters to make sure they are the same length
For the next step, we are going to use the skills we learned earlier this month, to make open centered, closed wire spirals.
Find the tutorial for this technique and other spirals in Wire Work Basics.
I strongly recommend that you complete the sprial tutorial before you start.
Using the very tip end of the round nose pliers, form a simple loop on the end of the long wire.
Very gently, tuck the end of the back into the loop.
The goal is to have the end of the wire pointing towards the back of the loop so your spiral will be more rounded in shape.
Remeber to work the spiral in small increments.
Repositioning the center loop often and moving the long wire only a few millimeters at a time.
I like to use the nylon pliers for spiraling, so I don’t leave scratch marks on my wire.
Insert the loop into the pliers, leaving a tiny bit visible.
Use your thumb or finger to push the long wire along side the loop.
Open the pliers and reposition the center loop and push the long wire a little bit more.
Work your spiral up the wire until it reaches the top.
Leave 2-3 mm, so you have room to push the spiral into position.
Hold the loop in your non-dominant hand.
Grasp the stone with your thumb and middle finger of your dominant hand as shown.
Use your forefinger of the dominant hand to push the spiral over and downward towards the stone below.
Repeat the steps above for spiraling the wire on the matching component.
You can follow the tutorial for Perfect Matching Earring Wires or use pre-fabricated findings of your choice for earrings.
Use these components for Charm Bracelets or as pendants or drops on a necklace.
I hope you like this project and enjoy uisng the lovely spiral wrapped briolette beads in your own designs.
Stay tuned for more great content.
Follow my blog and subscribe to my newsletter using the forms in the sidebar or on the contact page.
Subscribe to The Alluring Bead Boutique Design Channel