Hello and welcome back to my blog. I have been noticeably away for far too long. It has been such a struggle lately to get back to work, so I thought the best way to get back into the swing of things, would be with a brand new project series.
Today, I am going to show you how to make my Picasso Puffy Bracelet. As I designed the bracelet, I realized it is a perfect match to the Sumptuous Squares, we made recently. Once we finish with the bracelet, I will show you how to turn those luscious squares into a gorgeous pair of earrings. Finally, I will teach you how to make a matching pendant. So let’s get started on the materials list for today’s tutorial.
Tools and Materials
The materials list below include all the materials used in the series so far. I have included my affiliate links and I make a small commission if you choose to use them to purchase your supplies.
The crystals are used in the charm and attached to the end of a small piece of extender chain. I will be writing a separate tutorial for the Charm, as well as, an optional embellishment for the bracelet.
Getting Started
Thread a working length of thread to your needle. I prefer to work with about two wingspans at a time. Use as much or little as your are comfortable working with.
The technique we will use to create the base of the bracelet is a modified form of cubic right angle weave. Each component of the bracelet is worked in a round of 4 units and embellished before moving forward to a small bridge between the puffy squares.
I chose to embellish the tops of each component as I work the length of the bracelet, so that shrinkage does not become an issue later on. The bracelet begins and ends with a puffy component, and a final unit of RAW is used at each end to add the closure. On one end we have a lobster claw and on the other is an extender chain and beaded charm.
Each of the four units of the component is comprised of the following bead structure. As you work each additional unit of the component, some of the beads of the previous units will be shared.
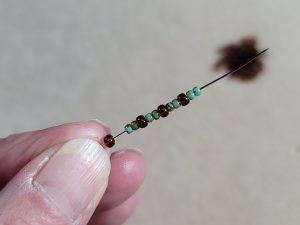
Pick up one 8/0 and two 11/0’s four times as shown.
Sew back through the beads to form a loop. At this point you have the option to tie two overhand knots to secure your tension or simply pass into the next beads to close the loop. Get into position by moving forward until your thread is exiting an 11/0 directly in front of an 8/0 bead.
Leave yourself approximately 5 inches of tail thread to add the small right angle weave unit at the end, used to add the jump rings.
To add the next unit, we will share an 11/0 – 8/0 – 11/0 on the base. Pick up the following beads: 11/0-8/0-two 11/0 – 8/0 – two 11/0 – 8/0 – 11/0. Pass back through the 11/0 – 8/0 – 11/0 on the base. Reinforce by passing through all the beads of this unit again.
In this photo, I have flipped the work to make it easier to get my needle into position. I pass through the next 11/0 – 8/0 – 11/0 to get into position before adding the next unit. I am left handed, so this makes it easier for me to sew in the same direction.
To add the next unit, we will share an 11/0 – 8/0 – 11/0 on the previous unit again. Pick up the following beads: 11/0-8/0-two 11/0 – 8/0 – two 11/0 – 8/0 – 11/0. Pass back through the 11/0 – 8/0 – 11/0 on the base. Reinforce by passing through all the beads of this unit again.
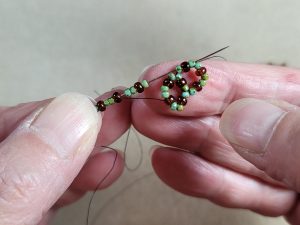
In this photo, I have flipped the work again. After reinforcing the whole unit, move through three sides of the third unit until you are exiting the 11/0 – 8/0 11/0 opposite the first unit as shown here. Notice here that we have two sides of the final unit already in place.
Get into position by sewing up through the 11/0 – 8/0 – 11/0 on the left side of the first unit as shown.
To complete the fourth unit, pick up an 11/0 – 8/0 – two 11/0 – 8/0 – 11/0 and sew down through the 11/0 – 8/0 – 11/0 on the right side of the third unit as shown. Fully reinforce the unit by sewing through all the beads again, until your thread is exiting the 8/0 in the center of the beads on the right side of the third unit.
The next step is to add a tiny set of embellishment beads to the top of each of the four units. To accomplish this we will sew back and forth through the 8/0 beads on opposite sides of each unit. The embellishment beads will form a tiny little X over the empty space in the center.
The working thread is exiting the bottom of the shared 8/0 between the 1st and 4th units. Pick up 11/0 – 8/0 – 11/0 and sew through the 8/0 across the center of the fourth unit, from top to bottom.
Pick up an 11/0 and sew back through the 8/0 in the middle of the embellishment beads.
Pick up an 11/0 and sew down through the 8/0 you started from as shown. Pull the thread nice and snug to tighten up the embellishment beads.
Repeat the steps above to embellish each of the remaining three units. As you add the final bead, pass through the final 8/0 plus the 11/0 in front of it.
Sew around the base unit until you pass through the two 11/0 beads that are opposite the two beads where your tail thread is exiting.
Now we are going to create a small bridge of beadwork to the next component, using Square Stitch. Pick two 8/0 beads and sew back through the two 11/0’s on the base.
Reinforce by sewing through the two 8/0’s, the two 11/0’s and then the two 8/0’s again.
Repeat the steps above but this time add two 11/0 beads above the 8/0’s. Reinforce and make that your thread is exiting the last two 11/0’s added.
From here the steps are the same as above until you reach the end of your bracelet with one slight change. The last two 11/0 beads added are shared with the beads you pick up for the first unit of this component. This changes the amount of beads needed to pick up for the first unit
Pick up the beads as follows: 8/0 – two 11/0 – 8/0 – two 11/0 – 8/0 – two 11/0 – 8/0 sew back through the two 11/0 on the base. Reinforce the unit and move into position for the second unit, and follow all the steps we used in the first component. Continue growing the beadwork to the desired length, remembering that the work ends with a component. On the ends, position the thread so that it is exiting the two 11/0 beads at the top of the last unit. Pick up three 8/0 beads and pass back through the two 11/0’s. Reinforce the beads at least 3 times as this is where the bracelet will get the most wear and tear as it is taken on and off. Weave the thread back through the bead work to end or tie a series of half-hitch knots before cutting the thread. Thread the needle onto the tail thread and repeat the steps to add a RAW unit of 8/0’s to this end the bracelet. End the thread using your preferred method.
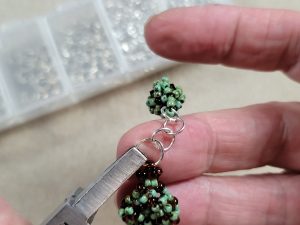
Thread a jump ring through the center 8/0 bead, add the lobster claw and tension set the jump ring.
On the opposite end, add another jump ring through the center 8/0 and the extender chain before closing the ring. In the next post, I will show you how I made the beaded charm that accents the end of the extender chain.
I hope you have enjoyed this tutorial. I will be back soon with the beaded charm lesson, and to show you a final embellishment option for the bracelet before moving on the the Sumptuous Squares Earrings.