Welcome to Part 4 of this month’s project, Pearls on the Halfshell Necklace and Earrings. 

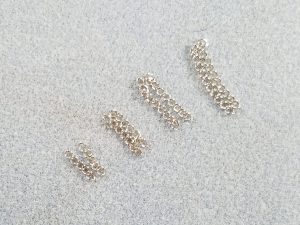
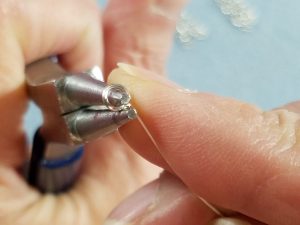
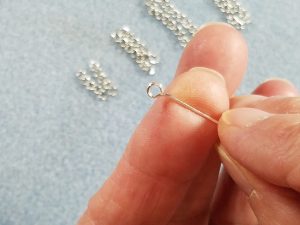
In this Tutorial, I want to share a technique to spruce up ordinary Jewelry Chain using the same materials used in the previous segments of this month’s project.

In Part 1, we created the Beaded Pearl Components, using a variation of the Tubular Herringbone Bead Weaving Technique to make a Half Moon Beaded Bezel and set the Swarovski Pearls.

20190317_095430

In Part 2, we used the Simple Loop and Wire Wrapped Loop Techniques, to complete the Earring and Pendant Components and add the gorgeous Drop Beads and Crystals.

We made perfectly matching Ear Wires to go with our project in Part 3.

For this tutorial, we followed the basic Metalsmithing at Home Tasks Guideline to achieve our goal. 

20190322_160219

Today, I will demo how to use the remaining Materials to make a lovely Beaded Link Chain to finish the Necklace portion of the project. 

Tools and Materials for Part 4

Beads

  • 4 – 4 mm Round Faceted Crystal Beads – Metallic Silver
  • 4 – 6mm Round Crystal Beads Metallic Silver

Supplies

  • 1 foot – 22 Gauge Dead Soft Jewelry Wire – Silver 
  • Clasp of your Choosing
  • 16 inches Chain
  • 2  3 mm Jump Rings
  • 3 – 5 mm Jump Rings
  • 1 – Lobster Claw Clasp
  • 1 – Soldered Ring

Tools

  • Flush Cutters
  • Ruler
  • Round Nose Pliers
  • 2 sets Chain Nose Pliers
  • Tape Measure
  • Sharpie to Mark you Pliers

Cutting the Chain

Cut 2 each of the following Chain Lengths

  • 5 Links
  • 7 Links
  • 9 Links 
  • 11 Links

Reserve the remaining chain for the final steps.

To start, lay the chain on a flat surface. 

Count down to the 6th link and cust with flush cutters. Repeat for the second section. 

For the remaining sections, cut two at the 8th and 10th links. 

20190322_081944

Double check each set of chains to make sure they are equal.

I use a needle or any pointed object to lift the sections to get an accurate look. 

If your chain is very small and hard to count follow these steps.

Measure and cut the first section.

Use a pointed object to pick up the two pieces of chain and measure prior to cutting. 

Always cut at least one link longer than you think you need to make sure you aren’t going to make a mistake. 

I can not tell you how many times I thought I was on the mark and wound up cutting the section too short. 

If you make a mistake, don’t throw the sections away. You can always find a creative way to  use these pieces in other projects. 

The Beaded Links

Remember to start with a flush cut on the wire at the beginning of each link.

Make a Simple Loop
Center the Loop over the Wire
Just like making an Eye Pin

It is very important to mark your pliers to get the same size loops on both ends of your Beaded Links. 

Make sure to place the wire in the same spot each time and your links will look perfect and professional. 

I marked my pliers in the spot that creates a loop similar in size to the size of my chain links. 

20190322_083000
20190322_083023
20190322_083110

Thread on one of your Beads.

Hold the Bead and Loop firmly in place and measure up 3/8 inch above the Bead.

With the Flush side of the cutters facing the bead, cut the wire at the mark.

Grasp the end of the wire with the Round Nose Pliers, making sure you are on your mark and flush with the barrels.

The new loop should be formed on the same plane as the first loop but rolled in the opposite direction. 

Make the Simple Loop on this end of the wire and gently center it over the bead. 

Repeat all these steps for each of your remaining Beads. 

Beaded Links can be a little tricky to master, so check out the Post and PDF if you need help mastering this skill and other options for making Beautiful Beaded Links.

Making the Connections

The first step is to layout your design components and decide how you want to proceed.

I have my chain section running from shortest to longest with the Pendant as my starting point.

I like the larger Beaded Links closest to the Pendant and the smaller ones going towards the back of the Necklace. 

You have the option of using jump rings at each connection points, but I chose only to use them on the ends.

20190322_085938 (2)

Open the first 6 mm Beaded link by pushing the loop over to the side using your Chain Nose Pliers.

Attach one end of your 5 link chain sections to the open loop. 

Using the pliers again, push the loop back to center and make sure to close it completely. 

Using both sets of your Chain Nose Pliers add one of the 3 mm Jump rings to the other end of your shortest Chain Sections.

Using the 2 sets of pliers, create Friction by rubbing the two sides of the Jump ring against each other until the ring snaps into closed position. 

Use the Proper Technique to add the 7 link Chain to the opposite side of your Beaded Link.

Add the other 6 mm Link to the other end.

Add the 9 link Section of Chain next.

Add a 4 mm Link and then connect an 11 Link Chain Section to the other side. 

Add a 4 mm Link to the other end. 

Repeat all these Steps for the second side of the necklace. 

20190322_090902

Adding the Pendant

For this step, utilize the small jump rings on the end of your chains to make the connection. 

20190322_093459
Open a 5 mm Jump Ring and add one side of the Chain
20190322_093511
Add the Pendant to the Right Side of the Chain
20190322_093519
Add the Second Chain to the Right of the Pendant

Close the jump ring using the friction technique to insure it is closed properly. 

Adjusting for Length

20190322_091552

Divide your remaining Chain equally and add to the last Beaded Link on each side of your necklace.

Here you have the option to use longer sections of chain to add length to your piece.

You can add more beaded links too if you prefer. 

It is up to you. 


The Clasps

20190322_092520
20190322_092637

Use the last tow 5 mm Jump Rings to add the Soldered Rings and the Lobster Claw to the ends of your Chain.

Note the positioning of the Lobster Claw above. Proper positioning makes it easier to open and close the Clasp for you or your customers. 

20190322_163614
20190322_163353
20190322_163431

That’s a wrap for the lovely and elegant Pearls on the Halfshell Project. 

I hope you fell in love with this beautiful mix of Bead Weaving with Wire Working Techniques. 

Make sure to follow me here and on my Social Media for more great projects, videos and articles from The Alluring Bead Boutique. 

See you in April for a new Project.