Today, we are going to talk about how to begin working with clay mediums to make stunning jewelry.
As we said in the earlier posts, many of the same tools can be used for both Polymer and Metal clays.
As we work through the article, I will be sure to make mention the differences between the two mediums and what precautions to take if you plan to share tools between multiple clay types.
Work Surfaces
When you are working with jewelry clays, you will need some very specific types of work surfaces.
Polymer and Metal clays are two very different forms of clay.
When working with Polymer clay you will need a clean and flat surface to work on. Polmer clay is notorious for picking up dust, dirt, and other particles and impressions.
A glazed ceramic tile is an optimal work surface for these clays. It is easy to clean, and very flat and impression free.
It is also very hard to scratch with your other clay tools. Tilesare also a great surface for Metal clay work as well. However, with Metalclays you will need to use a release agent, so the tacky clay will not stick to the surface.
These boards are very inexpensive and work very well with metal clays.
There also mats sold by fine suppliers specifically designed for use with various clay products.
It is up to you and how much of surface room you like to work on. Personally, I have all of the surfaces mentioned here.
As a final note on work surfaces, Metal clay has to dry out and harden before you can fire it, either with a torch or kiln. Having said that, you will need a non-stick surface to lay your work on for the drying period.
There are many options for this, but I prefer the options below:
Speaking of drying your Metal clay projects. There are a few ways to speed up that process and a mug warmer is the most economical and effective way to do just that.
But for larger work, or if you prefer, you can also use a food dehydrator. My Bravo XL toaster/convection oven has the dehydrator function as well.
Polymer clay does not require a drying stage before curing in your choice of oven. I use my Bravo XL for this clay.
It does not contain water in its formula, so therefore, you also do not have to account for shrinkage when you work with this medium.
Release Agents and Water
A release agent is used to lubricate the work surface and clay tools when working with Metal clay. You simply apply a small amount to the work item, including your hands, to prevent the expensive clay from sticking and causing loss of clay.
There are several items you can use as a release agent.
Cool Slip and Natures Touch are a few of the commercially designed formulas that you can use. But Olive Oil and Beeswax can serve the purpose just as well.
Due to the make-up of MetalClay, you will also want to keep some distilled water handy to reconstitute the clay as it naturally dries out as you work with it. A smallSpray bottle works very well for these tasks, as a little bit goes a long way when it comes to these tasks.
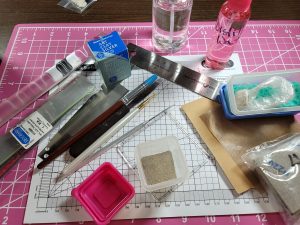
Rollers, Thickness Guides and Snake Makers
Just like any jewelry making technique, there are multiple ways to roll out your clay. Metal clay and Polymer clay projects generally begin by rolling your clay out to a specific thickness.
When we talked about Polymerclay, we learned that a dedicated pasta machine is most times used. Not only does the machine have various thickness settings, but it is also used to create sheets, blends and other various patterns of clay.
However, there will be many times that you will need a rollerhandy as well.
Now you can’t run Metal clay through a paste machine at all. It is entirely too expensive and tacky for that.
You are going to need an acrylic roller or even a piece of PVC pipe for this clay. You will also need something to use to gauge the thickness of your metal clay as you roll it out.
Just remember that you will need to lubricate most of your tools when working with Metal clays.
On the left is a set of commercial thickness guides. Each color is designed to equal a certain card thickness. And by card, I am referring simply toplaying cards.
The thickness guides come with a chart to detail which thickness each set of colors are equal to.
Each color comes with two guides. You can then stack the different colored guides to achieve the desired thickness.
But just as easily, you can tape playing cards together and use a Sharpie to give each stack the label is requires. Just remember that you will need two stacks of equal number of cards to roll out the clay.
Asnake maker is usually just a flat acrylic board that you used to form either type of clay, into a rope shape, referred to as a snake.
Snakes are used to add detail to flat work and also can be used to create wire type works of clay.
When making metal clay snakes, this is one task you will do without the use of release agents. Use a dry surface and a dry snake roller for this.
Cutting Tools
When you work with Metal or Polymer clay, you will need to have the proper cutting tools. Just as before, cutting tools will need to be lubricated with Metal clay.
Here is a brief list of the essential tools you might want to have on hand:
Tissue Blades are used to cut straight or slightly rounded edges to your clay. The Needle Tool is used to cut out fine detail inside to edges of the clay and is most often used with templates. A Scalpel Tool also comes in very handy for fine detail work and cleaning up the work in the dried stage.
There are a wide variety of specialty cutters on the market as well. Shop around and have fun with your clay.
Now that we have covered to most essential tools you need to work with jewelry clays, we need to discuss how to store your clays once opened.
I should also mention here that if you are planning to work with both precious and base metal clays, it is recommended to use separate surfaces and tools for this. You do not want to contaminate your precious metals with base metal clay.
Clay Storage
The proper storing of opened clay is very important to understand. Especially when it comes to expensive precious metal clays.
While Polymer clay is not water based, it can still become dried out and brittle. Once opened, it is best to store any unused clay wrapped in Saran wrap and sealed in and air-tight container.
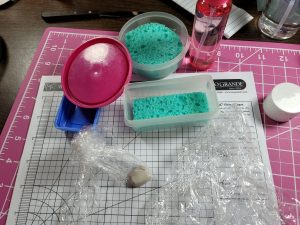
Metal clay on the other hand, does contain water and needs to be stored in a moist environment. It too needs to be wrapped plastic wrap and sealed in an air-tight container, but to add moisture to the chamber, a sponge is needed.
There are some commercially made clay keepers on the market, but I opted to make my own by cutting a sponge to fit my small containers. I simply dampen the sponges with the distilled water in my little spray bottle.
Occasionally, the clay may need a little bit of extra moisture. When you notice the edges of the clay looking a little cracked, you can spritz a single spray of the distilled water directly onto the plastic wrap and then seal the clay back into the wrap.
That is it for today’s post. I hope you have found something useful and will stick around for more jewelry clay content.
In the next post we will look at Jewelry Clay Sculpting and Decorative Tools. We will also talk about Textures, Templates, and other design aids.
So, stay tuned to this series.
Thank you for stopping by.....
*The links in this article are my Affiliate links to Amazon. I make a small commission if you use these links to purchase your jewelry supplies. You can help support the free content on this site by using my links.