Welcome back. After a long and arduous hiatus, I am back today with a new tutorial series. We will continue exploring creating shapes with Peyote Stitch, by creating a Marquis component.
In today’s lesson, I will demonstrate how to make the basic shape and discuss how to change the size of this lovely component.
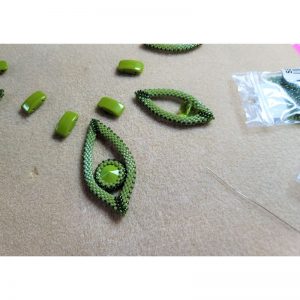
In the next portion of the series, I will show you how to add embellishments to the marquis, but the technique can be used to embellish any of the peyote shapes we have worked on so far.
The links above are my affiliate links. If you choose to purchase the materials using these links, I make a small commission that helps support my website and YouTube Channel.
The Technique
Although this bead weaving is often called tubular peyote, it is actually flat circular peyote worked in two layers. The front and back layers are stitched together at the end to form a tubular shape.
In all forms of peyote stitch, the initial bead count pick up, constitutes the beads of the first two rows. As the next round is added, row 3, the initial beads become offset and the first and second row become apparent.
After stitching the front side of the flat circular work, the thread is positioned back to row 1 and the back side of the component is stitched off the row one beads.
Understanding how to determine the Row 1 beads is very important and even more so when it comes to adding embellishments inside of the component. But I will address this more in the second tutorial.
Bead Counts for the Components
Large Component Initial Pickup:
Two 11/0 Toho – Thirty-three 11/0 Delica – Two 11/0 Toho – Thirty-three 11/0 Delica
Medium Component Initial Pickup:
Two 11/0 Toho – Twenty-seven Delica – Two 11/0 Toho – Twenty-seven Delica
Small Component
Two 11/0 Toho – Twenty-one 11/0 Delica – Two 11/0 Toho – Twenty-one 11/0 Delica
For the necklace project, you will need:
1 – Large Component
2 – Medium Components
2 – Small Components
You will also need to make a peyote bezel for your Rivoli. I will go over that in the next post.
I hope you have enjoyed this tutorial. If so please click like and share with your bead buddies.